 This
screen looks similar to Windows Explorer. On the left side, you see the recovery
tree with all the recovered directories. When you open a directory on the left
side, the recovered files in this directory are displayed on the right side.
This
screen looks similar to Windows Explorer. On the left side, you see the recovery
tree with all the recovered directories. When you open a directory on the left
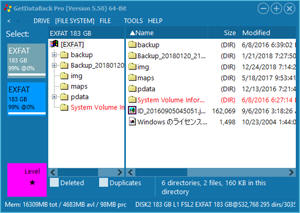
side, the recovered files in this directory are displayed on the right side. This
screen looks similar to Windows Explorer. On the left side, you see the recovery
tree with all the recovered directories. When you open a directory on the left
side, the recovered files in this directory are displayed on the right side.
We recommend you view a couple of files before copying them to a secure medium. Testing them ensures the recovery was successful, and the files are in good condition: Double-click, press Enter or F3 to view a file's content. GetDataBack comes with a couple of build-in viewers, such as JPG, BMP, PDF, DOC, ZIP, and more. If the file type is unknown or the particular viewer is unable to open a file, the build-in hex viewer displays the file's content.
In contrast to View, Open attempts to open a file with its associated application. To accomplish that, GetDataBack puts a copy of the file into your computer's temporary directory and invokes its native Windows application. Thus you can check and open almost any file type as long as the file is self-sufficient.
You are now ready to copy the files to a secure medium, such as a USB drive or a network drive. Tag the files or directories you want to copy. Push F5, and a window lets you choose the destination for the files. This destination can either be another hard drive or a network drive.
***Never copy the files to the drive you are recovering***
You can copy the entire directory tree by selecting the root entry on the left side, [EXFAT]. If you want to copy selected directories or files, you can select them in the right window. On the right, hold the CTRL-key to choose multiple files or directories.
Copying files to a secure medium requires you to buy a license key for the software. Inserting this key is quick and easy. You don' t have to repeat the recovery process; just enter the license key from here to enable copying your files.
 These two
checkboxes determine if GetDataBack includes deleted files or duplicate entries
in the recovery tree. Deleted files are files marked as deleted by
the file system, but they might still be retrievable. Duplicates
are present when one directory contains more than one file with the same name.
Click the checkboxes if you want any of these types of files included.
These two
checkboxes determine if GetDataBack includes deleted files or duplicate entries
in the recovery tree. Deleted files are files marked as deleted by
the file system, but they might still be retrievable. Duplicates
are present when one directory contains more than one file with the same name.
Click the checkboxes if you want any of these types of files included.
In Windows file systems, you find recovered deleted files in their original directory where a crossed-out filename marks them. If you are looking for files from an emptied recycle bin, you should look below the RECYCLE directory. Note that files inside the recycle bin do not bear their original filenames. However, they still have their original extension.
Not all file systems support the recovery of deleted files. The Windows file systems do, while the ones for Linux EXT and Apple HFS+ do not.
If you allow duplicate files and try to copy them, a prompt asks you to either overwrite, skip or rename these files. If you choose skip or overwrite, you can end up with file versions that are not necessarily the ones you wish to recover. If you choose rename instead, you can later sort out which files are the most current versions. With duplicates switched off, GetDataBack shows only the most recent file entry. If you mix deleted on with duplicates off, GetDataBack shows the most recent file entry, even if this is marked deleted, while suppressing an eventual not deleted version.
You can rename duplicate files manually, so they won't collide when copying.
Don't feel anxious about the recovery results after copying the files. In most cases, what you see in the recovery tree is what you get after copying the files. That means, if you can see your files in the recovery tree and their content looks all right, they most likely are all right after saving them.
However, we recommend to check several files. Use the following features of GetDataBack to verify the quality of the recovery:
Sometimes you have directories in the recovery tree with names similar to this one: 1229BD. That means that the root directory entry for this directory was lost, and the directory name could not be retrieved. The subdirectories (if there are any) and the files in the directory should nevertheless be in order.
If you have problems opening the recovered files, please see our checklist.
What if you don't see your files and directories in the Recovery Tree screen?
If you don't see the files you are looking for at all, go back to the Select File System screen and try other file system entries (if there are any). If you still cannot find your data, click on the purple Level rectangle in the lower-left corner. Here you can increase the thoroughness with which GetDataBack scans the drive. Possible are levels * up to ****. If you still cannot find your data, send us a snapshot of your recovery, along with a short description of what happened to your drive.
What if all you see on the left side is a list of numbered directories, but no or little directories with real names?
The root directory structure of your drive could not be recovered. That doesn't
automatically mean that the files and filenames are unrecoverable as well. Look into
the directories - if you are lucky, the subdirectory names and filenames
are intact, and those files open just fine.
You may also go back to the Select File System screen and try other file
system entries. Try to increase the Level. If this still does
not help, send us a snapshot of your recovery.
What if you see a bunch of familiar files and directories, but the specific files you are looking for are not there?
Search for your files - they may be hidden in some directory where you wouldn't expect them. To search for files, click on File->Search. Enter a part of the filename or the file's extension into the search mask (e.g., "*.jpg" or "myfiles*.*"). If you are still unable to locate the data you need, go back to the Select File System screen and try other entries. Try to increase the Level. If this still does not help, send us a snapshot of your recovery.
What if you see your directores, files, filenames - even with the right file size - but when you try to open a file to test it, it either won't open at all, or all you see are weird hex characters instead of your file content?
There is something wrong with your recovery at this point, and you won't be able to recover your files like that. First, go back to the Select File System screen and try other file system entries. If that does not help, please send us a snapshot.
At this point, you can save the current state of the recovery and continue later. Go to DRIVE->Save current recovery and choose a filename. This feature does not save the recovered files. It saves the status and structure of the recovery tree only. To save the recovered files, see Copy.
***Never save this file on the drive you are recovering***
Sort the files on the right side by size, name, attributes, creation date, and so on by clicking on the corresponding column header.
If the correct filenames do not come up (for instance, because the root directory information is destroyed), you can rename the files before copying them. Select the file or directories you wish to rename and press F2. This feature comes in handy when you are dealing with duplicates. Of course, you can also rename the files after you have copied them to a secure location.
GetDataBack includes a file search function. Go to FILE->Search and type in the search term.
| Appearance | Meaning |
|---|---|
| filename.ext | normal file or directory |
| filename.ext | read-only |
| filename.ext | system |
| filename.ext | hidden |
| filename.ext | compressed |
| deleted |
If you want to dive deeper into your recovery, you can look at the file information. Right-click the file you are interested in and click Info.

Use the small left and right arrows in the top left corner for going back and forth between the screens. Pressing the left arrow brings you back to the Select File System screen. Press the right arrow, and you move forward to the next screen. You can navigate between the screens without losing the progress. If a process needs to unload a current recovery, it warns you beforehand.
See also: View file, File information, Save recovery, Search, Checklist, License key