 Clicking Tools->Create single image
file allows you to create an image of a single
hard drive. That is usually recommended if there are bad sectors
on the drive.
Clicking Tools->Create single image
file allows you to create an image of a single
hard drive. That is usually recommended if there are bad sectors
on the drive.
Clicking Tools->Create single image
file allows you to create an image of a single
hard drive. That is usually recommended if there are bad sectors
on the drive.
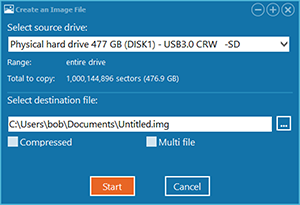
Select the drive you want to copy from and the file you want to copy to. You can pick any drive represented by a tile in the Select Drive screen, even other image files or Virtual Image files.
Checking Multi file splits the image into files of 650 MB. Assume you name the image "untitled.img", the segments will be named untitled.img, untitled.001, untitled.002, ..., untitled.999, untitled.a00, untitled.a01, etc. The last segment is always smaller, signaling the end.
Checking Compressed compresses the image. There are two compression levels, Fast and Good. Do not use compression if you create an image because of bad sectors on the source drive. This is not the time for that. Also, if the "bad drive" fails during the process, having an uncompressed image leaves you with some data, while a compressed image might turn out corrupted.
Make sure the target drive has sufficient space to hold the image file. Click Start to begin creating the image. Once you have created the image, you can use it in Runtime's data recovery products like a real drive. The imaging process counts the read errors it encounters. Make a note of that number, as well as the percentage of data read. The program fills unsuccessfully read sectors with 0's in the image.
See also: Drives, Image Files, Virtual Images, Read errors