d:\img\ix4\raid5-1.imc
d:\img\ix4\raid5-2.imc
d:\img\ix4\raid5-3.imc
d:\img\ix4\raid5-4.imc
Start RAID Reconstructor.
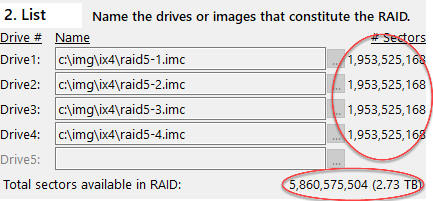
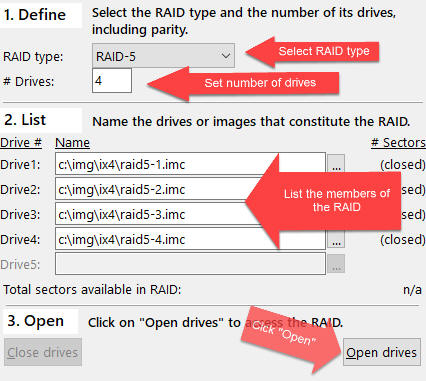
Select RAID-5 as the RAID type, Set # Drives to 4, Enter the names of the image files into the fields labeled Drive1, Drive2, Drive3, and Drive4:
Click Open drives.
Verify that all 4 drives show the size of 1,953,525,168 sectors and that the total size shows
(Number_Of_Drives-1) * Size_Of_Smallest_Drive = (4-1) * 1,953,525,168 = 5,860,575,504 sectors
4. Analyze, we need to determine the start sector first, because a software RAID has one starting not at 0.
A NAS is typically configured as a small RAID-1 (mirror) for the Linux OS, followed by a large RAID-5 for the data:
SECTOR# [0................][X..............................1953525167]
DRIVE1: [Linux OS (copy 1)][Data partition (RAID member 1) ]
DRIVE2: [Linux OS (copy 2)][Data partition (RAID member 2) ]
DRIVE3: [Linux OS (copy 3)][Data partition (RAID member 3) ]
DRIVE4: [Linux OS (copy 4)][Data partition (RAID member 4) ]
We are searching for the start sector X. Using the XOR method from RAID Example-3 is not practical here, because the RAID-1 would pass the XOR test and thus obscure our observations.
We will demonstrate two other methods for finding this start sector:
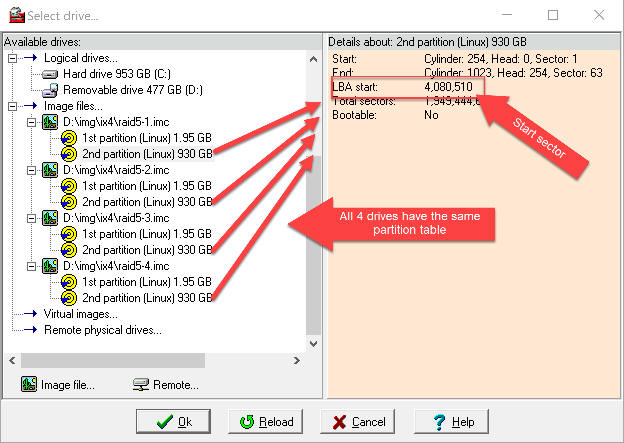
Start DiskExplorer.
Load image raid5-1.imc
In the partition table view of sector 0, you see two partitions:
The first partition is most likely the small Linux OS partition with 2 GB, while the second partition appears to be a large 1 TB partition. It begins at sector 4,080,510 which is our start sector X.
If you want to see that in a neater way, you can also invoke File->Drive. After loading all four drives, you can examine them all in one screen:
All member drives of the NAS have the same partition table with the large partition being the partition used to build the RAID-5. That partition starts at sector 4,080,510 on all drives.
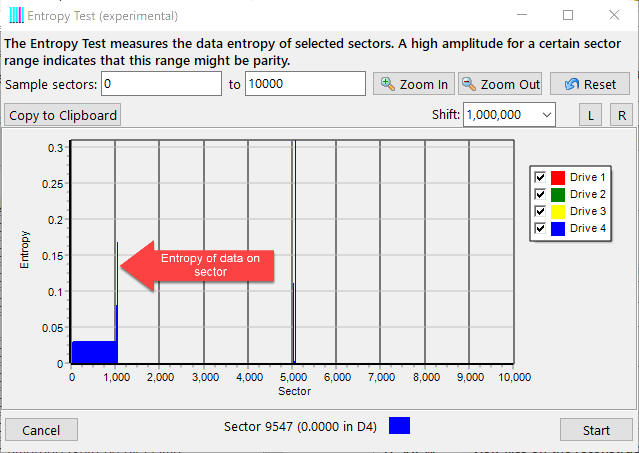
Click Tools->Entropy test, click Start
The graph shows the entropy (between 0 and 1) of the sectors 0..10,000 on the drives. The drives are displayed over each other. First drawn is drive 1 in red, followed by drive 2 (green), drive 3 (yellow), and drive 4 (blue). We know this area on the drives is mirrored over all drives, so the blue from drive 4 covers the other drives. Let's remove drive 4 by un-checking the checkbox to the left of the blue square followed by "Drive 4".
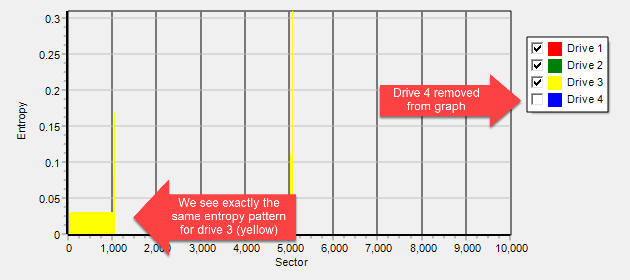
We see the same pattern in yellow as drive 3 is on top now. Remove drive 3 and the pattern will be green. Remove drive 2 and it will be red.
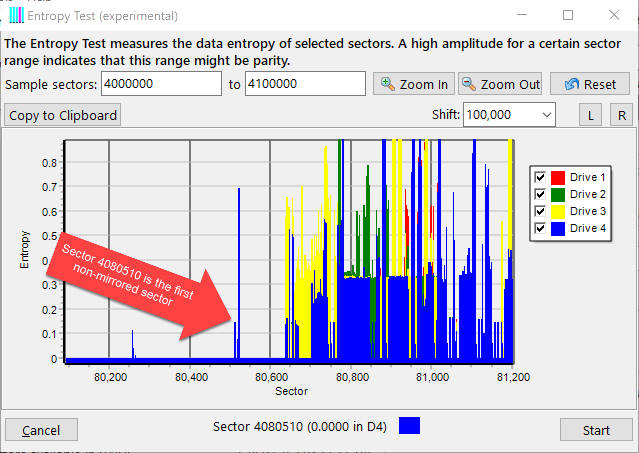
We are looking for the region on the drives were this mirror behavior changes to the drives' entropies being independent of each other and the graph displaying all colors randomly.
Please fill the screen with the values below:
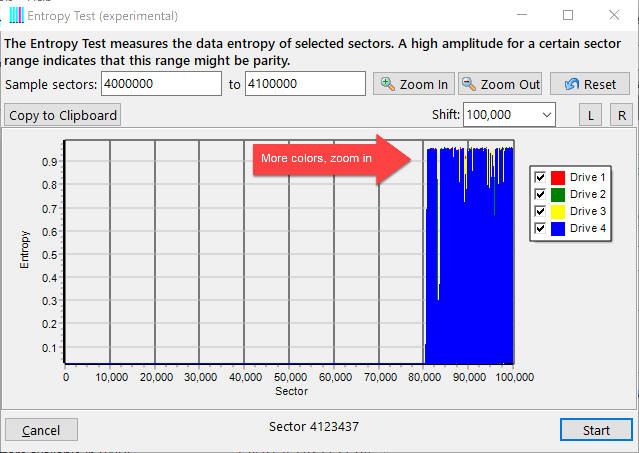
Click on the "R" button near the upper-right corner. This will shift the graph by 100,000 sectors.
Click "R" repeatedly until you see all four colors. After shifting about 40 times you can see additional colors behind the top drive:
Zoom in and examine this area in detail. Click overlaying drives on and off in order to find the first un-mirrored sector. This sector turns out to be sector 4,080,510.
You can also examined this area in DiskExplorer and you will find "LABELONE" which is the signature for Linux' LVM (Logical Volume Manager).
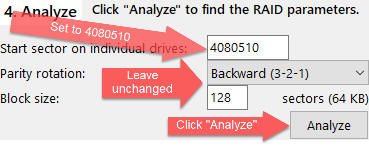
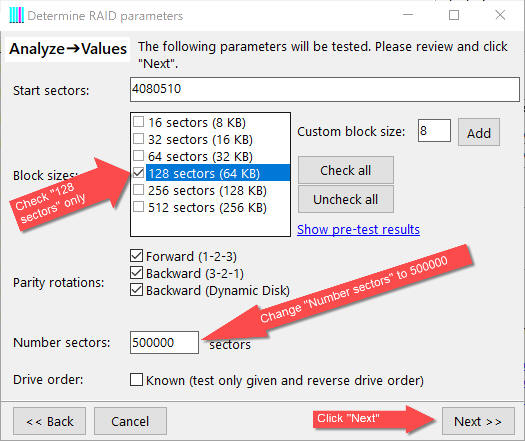
Set the Start sector to 4,080,510.
Also, leave the Block size and the Parity rotation unchanged. These values will be determined by the analysis we are going to start.
Click Analyze.
The Analysis wizard will start:
Select Managed Auto (2020) and click Next. The wizard performs a pre-test.
We want to leave the parameters and the number of sectors that we want to probe unchanged. Click Next.
Unfortunately, we do not get a "Recommended entry". The best entry has an entropy of 0.15 while the next best has one of 0.16. The difference is less than the required threshold of 20%. However, we see all competing entries have a block size of 128. Let's go back to the previous screen and check block size 128 only. This will reduce the time needed for testing all combinations. Increase the value of "Number sectors" to 500,000.
Click "Next".
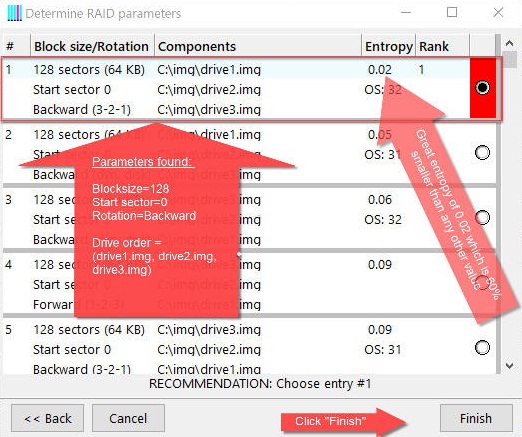
This time we are successful and get a "RECOMMENDATION". The entry found is at least 20% smaller than any other entry.
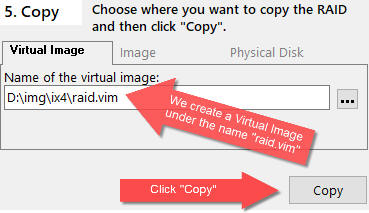
Click Finish and the found parameters get transferred into the corresponding fields in the main screen:
Now we are ready to copy the combined array to a virtual image file. Specify a target file name and click Copy.
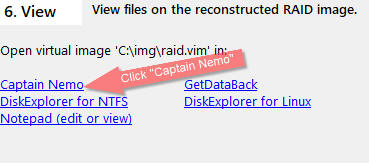
Immediately after clicking Copy we have a small file d:\img\ix4\raid.vim. Mount this image with Captain Nemo or scan it with GetDataBack in order to retrieve the data from it.
Click on Captain Nemo
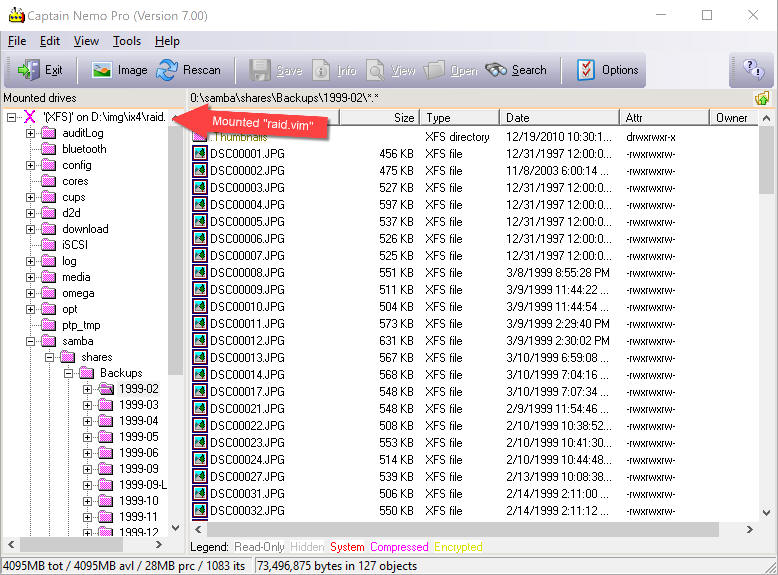
The file system is XFS and you are ready to copy your files off the lost RAID.
See also: